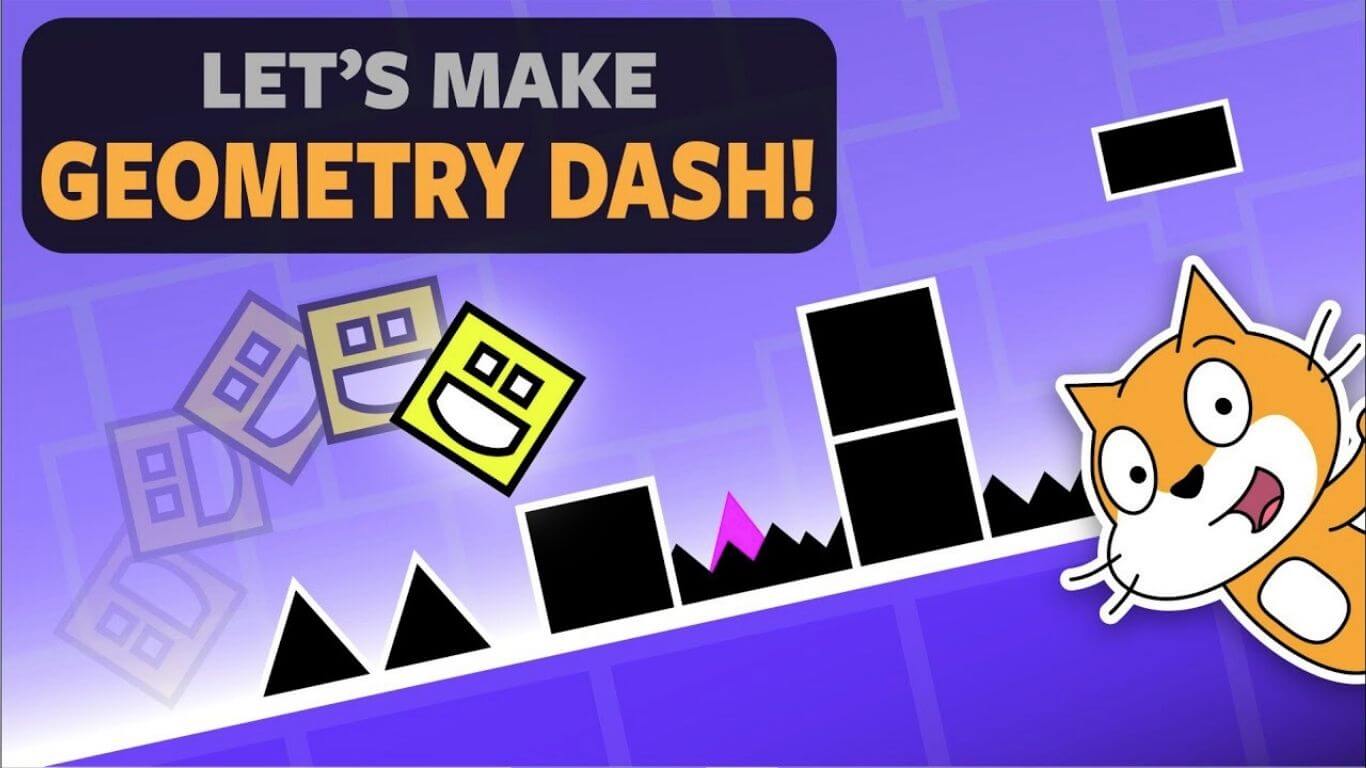
Want to build your own Geometry Dash game from scratch? You’re in the right place! In this guide, you’ll learn how to create a fun, interactive Geometry Dash-style game using Scratch — perfect for beginners and kids. With easy-to-follow instructions and visuals, you’ll have your own game up and running in no time.
Whether you’re a student, parent, or educator, this tutorial makes coding enjoyable. Plus, it’s a great starting point for learning game design and programming fundamentals with Scratch.
What Is Geometry Dash in Scratch?
Geometry Dash is a fast-paced, side-scrolling game where players control a character that jumps to avoid spikes and obstacles. The goal? Survive as long as possible and reach the end of the level.
In Scratch, you can recreate this experience using simple coding blocks. You’ll design your own characters (sprites), build a backdrop, and add logic to control movements and score points.
Step 1: Choose or Create Your Game Backdrop
Start by visiting the MIT Scratch website and logging into your account. A blank backdrop is set by default, but you can choose or design one to match your game’s theme.
Click the mountain icon on the bottom-right corner to select a backdrop. Want to get creative? Use the paintbrush tool to draw your own. For this game, you’ll need two backdrops:
- Gameplay Backdrop: A simple design with a yellow pathway.
- Game Over Backdrop: A distinct screen to signal the end of the game.
Step 2: Design Your Sprites
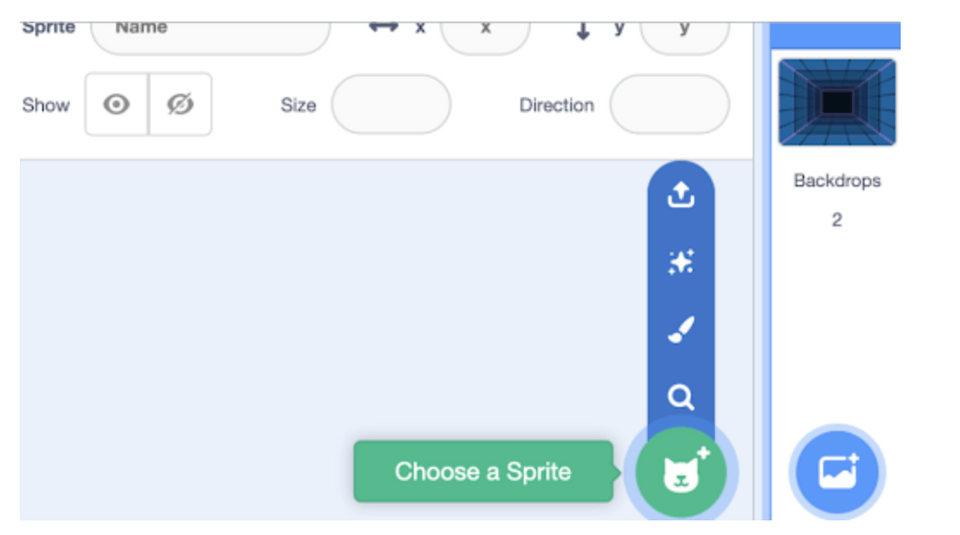
Your game needs characters (sprites). Click the blue cat icon in the bottom-right corner and select the paintbrush to draw your sprites.
You’ll create two main sprites:
- Player Sprite: A square-shaped character that jumps over obstacles.
- Obstacle Sprite: Triangle-shaped spikes with 3–4 costume variations for animation.
This step adds personality to your game. Customize your player and obstacles however you like!
Step 3: Create a Score Variable
Head to the Variables tab and click Make a Variable. Name it score. This variable will track how many points the player earns during the game.
This step is essential for game logic and tracking progress as the player avoids spikes.
Step 4: Code the Player to Jump
Now it’s time to add interactivity.
- Select the player sprite and drag out the “When green flag clicked” block.
- Add the following under it:
ShowPoint in direction 90Go to x: -152 y: -104
- To make the player jump:
- Use a
Foreverblock. - Inside it, use an
If <key space pressed>block. - Add two
Repeat 10blocks:- First:
Turn 10° clockwise,Change y by 10 - Second:
Turn 10° clockwise,Change y by -10
- First:
- End with
Point in direction 90.
- Use a
This makes the player jump every time the space key is pressed.
Step 5: Reset Score and Clone Spikes
Spikes should appear continuously, so we’ll use cloning.
- Click the spike sprite and start with
When green flag clicked. - Add:
Set score to 0Hide
- Add a
Foreverloop:- Inside it, place
Create clone of myself - Then,
Wait 1 second
- Inside it, place
This resets the score and keeps spawning new spikes for the player to dodge.
Step 6: Animate the Spike Movement
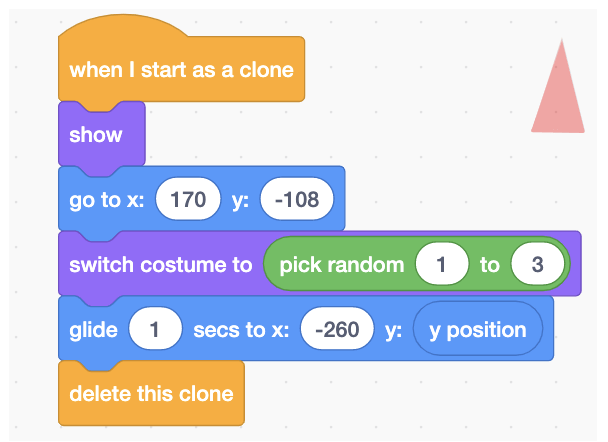
Let’s make the spikes move across the screen:
- Use
When I start as a clone. - Add:
ShowGo to x: 170 y: -108Switch costume to [pick random 1–3]Glide 1 sec to x: -280 y: [same y-position]Delete this clone
This creates the illusion of motion and keeps the challenge consistent.
Step 7: Add Point Scoring Logic
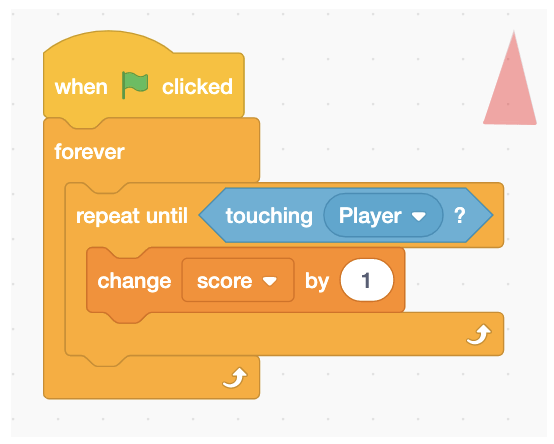
To reward players:
- Start with
When green flag clicked. - Add a
Foreverloop and then aRepeat until <touching spikes>block. - Inside, use
Change score by 1.
The score increases as long as the player avoids touching the spikes.
Step 8: Handle Game Over Logic
When the player hits a spike, the game should end.
- Select the player sprite and use
When green flag clicked. - Inside a
Foreverloop, add anIf <touching spikes>block. - Inside it, include:
Switch backdrop to [Game Over]Stop all
This creates a clean transition to the Game Over state.
Step 9: Hide the Player on Game Over
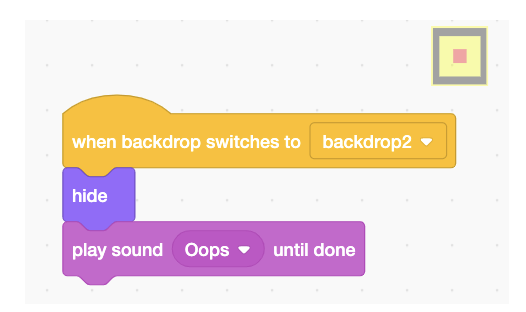
To polish the experience:
- Use
When backdrop switches to [Game Over]. - Add:
HidePlay sound [Game Over] until done
This makes the ending feel complete and gives players clear feedback.
Final Thoughts
Creating a Geometry Dash game on Scratch is a fantastic way to explore game development and logic. With just a few sprites, variables, and conditionals, you’ve made a full game with scoring, animation, and challenge.
Want to build more games like this?
Check out our live online Scratch classes designed by pros from Google, MIT, and Stanford. Try a free intro class today — perfect for Grades 2–9.
Common Issues and Bugs for our Geometry Dash Game Tutorial and How to Solve Them
Creating a Geometry Dash game in Scratch is a fun and creative project, but you might encounter some common issues along the way. Here are solutions to help you troubleshoot:
Issue: The player sprite does not jump or the jump is not smooth.
Solution: Ensure that the “when space key pressed” block is placed inside the “forever” loop and is properly nested within the “if” condition. Double-check that you have two “repeat 10” blocks inside the “if” condition, and that each “repeat” block contains both the “turn clockwise 10 degrees” and “change y by” blocks. Also, ensure that the “point in direction 90” block is correctly positioned after the “repeat” blocks.
Issue: The spikes do not appear on the screen or do not move across the pathway.
Solution: Verify that the “when I start as a clone” block is correctly set up for the spike sprite. Ensure the initial position of the spike sprite is set with the “go to x: 170 y: -108” block. Make sure the “show” block is placed after the initial position block to make the spike visible. Check that the “glide 1 sec to x: -280 y: y position” block is correctly positioned to move the spike across the screen, and that the “delete this clone” block is at the end of the stack to remove the spike once it reaches the end.
Fastidious replies in return of this difficulty with solid arguments and explaining everything regarding that.